This chapter contains the following topics:
Introduction to Special Sale Prices
Entering Special Sale Prices Using Percent Discounts
Entering Special Sale Prices Using Price Codes
The PBS Point of Sale Special Sale Prices feature allows you to temporarily change the price of an item, service or category of items or services without making any changes to I/C Items or P/S Services.
Three different types of sales can be defined. Fixed sale prices allow you to set a lower price for a specific item of service. Percentage off sales allow you to set up a percentage that will be discounted from the regular price of items or services. And, finally, price code sales allow you to specify a new price code, overriding the regular price code. All the above may be defined within a date range and a time of day range.
If you plan to define sale prices using price codes, you will need do know how price codes work in PBS. Refer to the Inventory Control documentation for more information on price codes.
Alternatively, Point of Sale may accesses the I/C Sale prices feature. See the 16. Use I/C Alternate units for contract and sale pricing ? field in the Control information chapter for details.
The most basic form of a sale is when an item is placed on sale for a specific price. Here is an example.
|
Item# / Service # |
1 |
|
Start effect date |
12/01/09 |
|
End effect date |
12/31/09 |
|
Start effect time |
(no start time) |
|
End effect time |
(no end time) |
|
Price code |
(this field was left blank) |
|
Price-1 |
(Highest price) |
|
Price-2 |
(Lower than price 1) |
|
Price-3 |
(Lower than price 2) |
|
Price-4 |
(Lower than price 3) |
|
Price-5 |
(Lower than price 4) |
This method cannot be used for an entire category of items or services since Price-1, 2, 3, 4 & 5 cannot be entered for a category. This is because the variety of items and services in a category most likely vary in prices. Fixed Sale Prices are a useful way of setting up sales, but since they are so straightforward, they are not discussed further in this chapter.
Another common sale is a percentage off. Here is an example using an item category.
|
Category |
TOOLS |
|
Start effect date |
12/01/09 |
|
End effect date |
12/31/09 |
|
Start effect time |
(no start time) |
|
End effect time |
(no end time) |
|
Percent disc |
10.00 |
|
Price-1 |
use item price-1 |
|
Price-2 |
use item price-2 |
|
Price-3 |
use item price-3 |
|
Price-4 |
use item price-4 |
|
Price-5 |
use item price-5 |
This type of sale would similarly apply for a specific item or service.
A sale can be based on a price code. The price code must be defined in Inventory Control before entering the sale. Suppose item #1 was defined with a price code type 01 (discount based on quantity purchased). The sale will offer higher percentage discounts based on the same quantities as the original price code.
A new price code must be entered in Inventory Control, A1 for example, reflecting the sale discount percentages. Then the sale price is entered in Point of Sale as follows.
|
Item # / Service # |
1 |
|
Start effect date |
12/01/09 |
|
End effect date |
12/31/09 |
|
Start effect time |
(no start time) |
|
End effect time |
(no end time) |
|
Price code |
A1 |
|
Price-1 |
use item price-1 |
|
Price-2 |
(blank) |
|
Price-3 |
(blank) |
|
Price-4 |
(blank) |
|
Price-5 |
(blank) |
In the next example, item #3 is discounted based on a type 02 price code where the discount is defined by the customer type. Suppose all tools (category TOOLS) will be on sale, but only for retail customers.
A new price code must be entered in Inventory Control, A2 for example, reflecting higher discounts for retail customers and leaving discounts for other customer types at normal rates. The following indicates how this would be entered in Sale Prices.
|
Category |
TOOLS |
|
Start effect date |
12/01/09 |
|
End effect date |
12/31/09 |
|
Start effect time |
(no start time) |
|
End effect time |
(no end time) |
|
Price code |
A2 |
|
Price-1 |
use item price-1 |
|
Price-2 |
use item price-2 |
|
Price-3 |
use item price-3 |
|
Price-4 |
(blank) |
|
Price-5 |
(blank) |
|
Note |
Sale prices always override item prices. The price code in the sale price record overrides the item’s normal price code. Even if the sale price does not specify a new price code, the item price code will be ignored when the sale price is calculated. |
You can also define a new price basis within a sale price. Suppose price-1 from the item price code is $35.00. If this price was entered as 31.50 in the sale price record, the sale price would be applied to this new price basis.
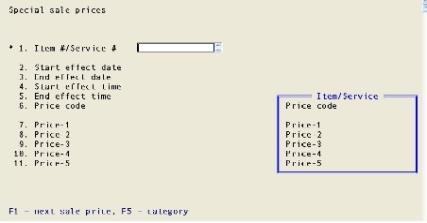
Use the Special sale prices selection to enter sale prices for Items, services or categories of items or services. You will not be able to access this feature if you have it turned off in the POS Control information.
Select
Special sale prices from the Pricing menu. The following screen displays:
From this screen, you can work with both new and existing sale prices. If sale price information has already been entered for an item or category with a specified date range, that record will be displayed for you to make changes or to delete.
This section describes how to enter a sale that is a percentage off the regular price.
*1. Item#/Service #
This is a number that identifies an item or a service. Items specified must exist in Items in Inventory Control. Services specified must exist in Services in Point of Sale.
Options
Enter an item number or a service number or use the option:
|
<F1> |
To scan through existing sale price records. |
|
<F2> |
To scan through the items and services in order by item/service number. |
|
<F5> |
To enter a sale for entire category of items or services. |
|
Format |
Up to 15 characters |
|
Example |
Press <F5> to enter a seal for a category of items or services. |
*1. Category
When <F5> is pressed, the screen will be redisplayed for entry of a sale price for a category of items or services rather than a single item or service number.
Options
Enter the category code or use the option:
|
<F1> |
To scan through existing sale price records. |
|
<F5> |
To enter a sale of an item or service number. |
|
Format |
Up to 5 characters |
|
Example |
Type TOOLS |
2. Start effect date
Options
Enter the date that the sale price will go into effect or use an option:
|
<Enter> |
To use the displayed date (defaults to last start date entered). |
|
<F1> |
To scan through existing sale prices beginning from the item, service or category entered in field 1. |
|
<F2> |
To specify no starting date. The sale price will take effect immediately. |
|
Format |
MMDDYY |
|
Example |
120109 |
3. End effect date
Options
Enter the date of the last day the sale price will be in effect or use an option:
|
<Enter> |
To use the displayed date (defaults to last end date entered). |
|
<F2> |
To specify no ending date. The sale price will take effect immediately. |
|
Format |
MMDDYY |
|
Example |
123109 |
4. Start effect time
Options
Enter the time that the sale price will go into effect or use the option:
|
<Enter> |
To use the displayed time. |
|
<F2> |
To specify no starting time. The sale price will take effect at midnight. |
|
Format |
HHMM, you may enter a time between 1200 and 1159 |
|
Example |
1200 |
(AM or PM)
After you enter a specific Start effect time then you must designate that this time is either AM or PM.
|
A |
AM = After 12 midnight and before 12 noon |
|
P |
PM = After 12 noon and before 12 midnight. |
|
Format |
One character, either A or P |
5. End effect time
Options
Enter the time of the last moment the sale price will be in effect or use an option:
|
<Enter> |
To use the displayed time |
|
<F2> |
To specify no ending time. The sale price will be in effect until midnight. |
|
Format |
HHMM |
|
Example |
0600 |
(AM or PM)
After you enter a specific End effect time then you must designate that this time is either AM or PM.
|
A |
AM = After 12 midnight and before 12 noon |
|
P |
PM = After 12 noon and before 12 midnight. |
|
Format |
One character, either A or P |
6. Price code
Options
If this sale price will use a price code, refer to the next section titled Sale Prices Using Price Codes. Use the option to enter a discount percent.
|
<F5> |
To enter a discount percent for this sale price. |
|
Format |
Up to 2 characters. |
|
Example |
Press <F5> to enter a discount percent. |
6. Percent disc
If this sale price will not use a price code, enter the discount percent that will be applied to the item, service or category of items or services.
Options
Otherwise, use the option to enter a price code.
|
<F5> |
To specify a price code for this sale price. |
|
Format |
99.999 |
|
Example |
Type 10 to specify a 10% discount. |
When specifying a percent discount, as we have in this example, the price fields will not change and will indicate that the normal pricing will be used for each of the prices.
7. Price-1
Defaults to “use item price-1” for percent discount sales.
8. Price-2
Defaults to “use item price-2” for percent discount sales.
9. Price-3
Defaults to “use item price-3” for percent discount sales.
10. Price-4
Defaults to “use item price-4” for percent discount sales.
11. Price-5
Defaults to “use item price-5” for percent discount sales.
Field number to change ?
If this is a new sale price record, you will be allowed to make changes to any field displayed on the screen.
If this was an existing sale price record, you will not be allowed to change field number 1.
Options
Make any desired changes and use an option.
|
<Enter> |
To save the information you have just entered. |
|
<Esc> |
To discard the information as entered. |
This section describes how to enter a sale price using a price code.
When planning to use a price code to control the sale price, the price code must first be defined in Inventory Control. Two examples follow.
| • | Tools are being placed on sale for retail customers only. (Customer types used must be assigned to customers in Accounts Receivable.) A price code must be created that discounts based on the customer type; retail. This a sale price record can be entered for the TOOLS category using that price code. |
| • | Item #1 is being placed on sale and you want to apply higher discounts to the item. A price code is assigned to item #1 that provides for a discount by quantity purchased. A new “discount by quantity” price code is created in Inventory Control reflecting the higher discounts for the sale price. A new sale price record is added for item #1 that uses the new item pricing code. |
Item codes entered here for an item act like permanent item codes entered in inventory control except that they are only in effect for the specified date range on the sale price record.
*1. Item#/Service #
This is a number that identifies an item or a service. Items specified must exist in Items from Inventory Control. Services specified must exist in Services in Point of Sale.
Options
Enter an item number or a service number or use the option:
|
<F1> |
To scan through existing sale price records. |
|
<F2> |
To scan through the items and services in order by item/service number. |
|
<F5> |
To enter a sale for entire category of items or services. |
|
Format |
Up to 15 characters |
|
Example |
Press <F5> to enter a seal for a category of items or services. |
*1. Category
When <F5> is pressed, the screen will be redisplayed for entry of a sale price for a category of items or services rather than a single item or service number.
Options
Enter the category code or use the option:
|
<F1> |
To scan through existing sale price records. |
|
<F5> |
To enter a sale of an item or service number. |
|
Format |
Up to 5 characters |
|
Example |
Type TOOLS |
2. Start effect date
Options
Enter the date that the sale price will go into effect or use an option:
|
<Enter> |
To use the displayed date (defaults to last start date entered). |
|
<F1> |
To scan through existing sale prices beginning from the item, service or category entered in field 1. |
|
<F2> |
To specify no starting date. The sale price will take effect immediately. |
|
Format |
MMDDYY |
|
Example |
010106 |
3. End effect date
Options
Enter the date of the last day the sale price will be in effect or use an option:
|
<Enter> |
To use the displayed date (defaults to last end date entered). |
|
<F2> |
To specify no starting date. The sale price will take effect immediately. |
|
Format |
MMDDYY |
|
Example |
013106 |
4. Start effect time
Options
Enter the date that the sale price will go into effect or use the option:
|
<F2> or <Enter> |
To specify no starting date. The sale price will take effect at midnight. |
|
Format |
HHMM, you may enter a time between 1200 and 1159 |
|
Example |
1200 |
(AM or PM)
After you enter a specific Start effect time then you must designate that this time is either AM or PM.
|
A |
AM = After 12 midnight and before 12 noon |
|
P |
PM = After 12 noon and before 12 midnight. |
|
Format |
One character, either A or P |
5. End effect time
Options
Enter the time of the last moment the sale price will be in effect or use an option:
|
<Enter> |
To use the displayed time |
|
<F2> |
To specify no ending time. The sale price will be in effect until midnight. |
|
Format |
HHMM |
|
Example |
0600 |
(AM or PM)
After you enter a specific End effect time then you must designate that this time is either AM or PM.
|
A |
AM = After 12 midnight and before 12 noon |
|
P |
PM = After 12 noon and before 12 midnight. |
|
Format |
One character, either A or P |
6. Price code
The price code specified here will override the price code on the item, the service during the sale. If this sale is for an entire category, the price code entered here will override the price codes for all of the items or services in the category during the sale.
Options
Enter the price code that was created in Inventory Control for this sale or use an option.
|
<Blank> |
To specify a fixed sale price or prices in the fields below. Fixed sale prices can only be used if you are entering a sale for a specific item or service. This option is not valid for categories. |
|
<F5> |
To specify a percent discount. |
|
Format |
Up to 2 characters. |
|
Example |
Type A1 for the price code entered in Inventory Control. |
If this sale is for a category the following price fields will not change and will indicate that the normal pricing will be used for each of the prices.
7. Price-1
This is the first of five prices that can be used for the sale. This would be the highest price charged for the item.
|
Note |
Services only allow one price level. |
Options
Enter Price-1 for this sale or use an option:
|
<Blank> |
To enter zero for price-1. |
|
<F2> |
To use price-1 from the item or service record. |
|
Format |
9999999.999 |
|
Example |
Press <F2> |
8. Price-2
This will be the next highest price charged for the item and must be lower than Price-1. If the specified price code only uses price-1 as the basis, this price will be ignored.
Options
Enter price-2 or use an option:
|
<Blank> |
To enter zero for price-2. |
|
<F2> |
To use price-2 from the item record. |
|
Format |
9999999.999 |
|
Example |
Leave this field <Blank> if price code A1 only uses Price-1. |
9. Price-3
This will be the next highest price charged for the item and must be lower than Price-2. If the specified price code only uses price-1, this price will be ignored.
Options
Enter price-3 or use an option:
|
<Blank> |
To enter zero for price-3. |
|
<F2> |
To use price-3 from the item record. |
|
Format |
9999999.999 |
|
Example |
Leave this field <Blank> if price code A1 only uses Price-1. |
10. Price-4
This will be the next highest price charged for the item and must be lower than Price-3. If the specified price code only uses price-1, this price will be ignored.
Options
Enter price-4 or use an option:
|
<Blank> |
To enter zero for price-4. |
|
<F2> |
To use price-4 from the item record. |
|
Format |
9999999.999 |
|
Example |
Leave this field <Blank> if price code A1 only uses Price-1. |
11. Price-5
This will be the lowest price charged for the item. If the specified price code only uses price-1, this price will be ignored.
Options
Enter price-5 or use an option:
|
<Blank> |
To enter zero for price-5. |
|
<F2> |
To use price-3 from the item record. |
|
Format |
9999999.999 |
|
Example |
Leave this field <Blank> if price code A1 only uses Price-1. |
Field number to change ?
If this is a new sale price record, you will be allowed to make changes to any field displayed on the screen.
If this was an existing sale price record, you will not be allowed to change field number 1.
Options
Make any desired changes and use an option.
|
<Enter> |
To save the information you have just entered. |
|
<Esc> |
To discard the information as entered. |
Use this selection to print out a list of Sale Prices. You will be able to print this list in sequence by item or service number or by Category.
Select
Special sale prices from the Reports, prices menu. The screen displays as follows:
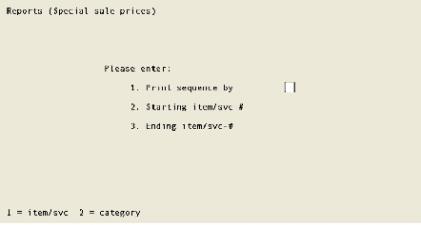
1. Print sequence by
You may print the Special Sale Prices List either by Item/Service number or by Category.
|
1 |
To print by item or service number |
|
2 |
To print by category |
|
Format |
One digit, either 1 or 2 |
|
Example |
Type 1 to print by item or service number |
If you elect to print by item or service number you will be prompted for starting and ending numbers.
2. Starting item/svc-#
Options
Enter the starting item or service number for the report or use the option:
|
<F1> |
To default to the “First” item or service number |
|
Format |
Up to 15 characters |
|
Example |
Press <F1> for the “First” item or service number |
3. Ending item/svc-#
Options
Enter the ending item or service number for the report or use the option:
|
<F1> |
To default to the “Last” item or service number |
|
Format |
Up to 15 characters |
|
Example |
Press <F1> for the “Last” item or service number |
If you elect to print by category you will be prompted for starting and ending categories.
2. Starting category
Options
Enter the starting category for the report or use the option:
|
<F1> |
To default to the “First” item or service number |
|
Format |
Up to 5 characters |
|
Example |
Press <F1> for the “First” category |
3. Ending category
Options
Enter the ending category for the report or use the option:
|
<F1> |
To default to the “Last” category |
|
Format |
Up to 5 characters |
|
Example |
Press <F1> for the “Last” category |
Field number to change ?
Options
Make any desired changes in the parameters entered for the report or use one of the options:
|
<Enter> |
To print the report |
|
<Esc> |
To discard all parameters and re-enter |
This selection allows you to purge sale prices from your system. You may purge one record or all records.
Select
Purge special sale prices from the Utility menu. The screen displays as follows:
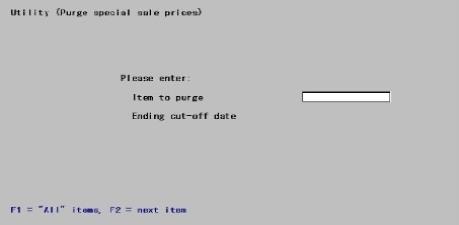
You will be prompted to enter the item or service number of sale prices that you wish to purge.
|
Note |
Care must be taken to protect valuable data when using this function. It is quite easy to remove all records from Special Sale Prices. |
Item to purge
Options
Enter the item or service number for special sale prices that are to be purged or use an option:
|
<F1> |
To purge special sale prices for “All” items and services |
|
<F2> |
To scan through items and services |
|
Format |
Up to 15 characters |
|
Example |
Press <F1> to purge special sale prices for all items and services |
When the <F1> option is elected, the field will be filled with “All”.
Ending cut-off date
Enter the cut-off date for the purge. Any special sale price with an ending date on or before this date will be purged from Special Sale Prices.
Options
Enter a date or use the option:
|
<F1> |
To purge items for all dates |
If you entered an item or service number in the previous field, using <F1> here will purge all special sale prices for that item regardless of the ending date.
If “All” items and services were specified in the previous field, using <F1> here will purge all the Special Sale Prices.
|
Format |
MMDDYY |
|
Example |
Type 123106 |
Any change ?
You will be prompted to answer Y or N to any change in the purge parameters that were entered. The default is N.
If you elected to purge all items or services for all dates, the following message will be displayed.
*** WARNING WARNING WARNING ***
*** ***
*** You are about to purge the entire ***
*** special sale price file. ***
Are you sure ?
You will be given another option to abort the purge process.
|
Y |
Type Y to purge Special Sale Pricing |
|
N |
Type N to abort the purge process and return to the main P/S menu |
If you answer Y, a period of processing will follow and you will be prompted to return to the main P/S menu.
Purge complete - press <Esc>